Snowflake
How to set-up your Dust Snowflake connection
Overview
Dust does not synchronize or store any of your Snowflake data. We only store metadata, such as databases, schemas or tables names.
You can connect Dust to your Snowflake data warehouse to enable your agents to perform Table queries on your Snowflake tables.
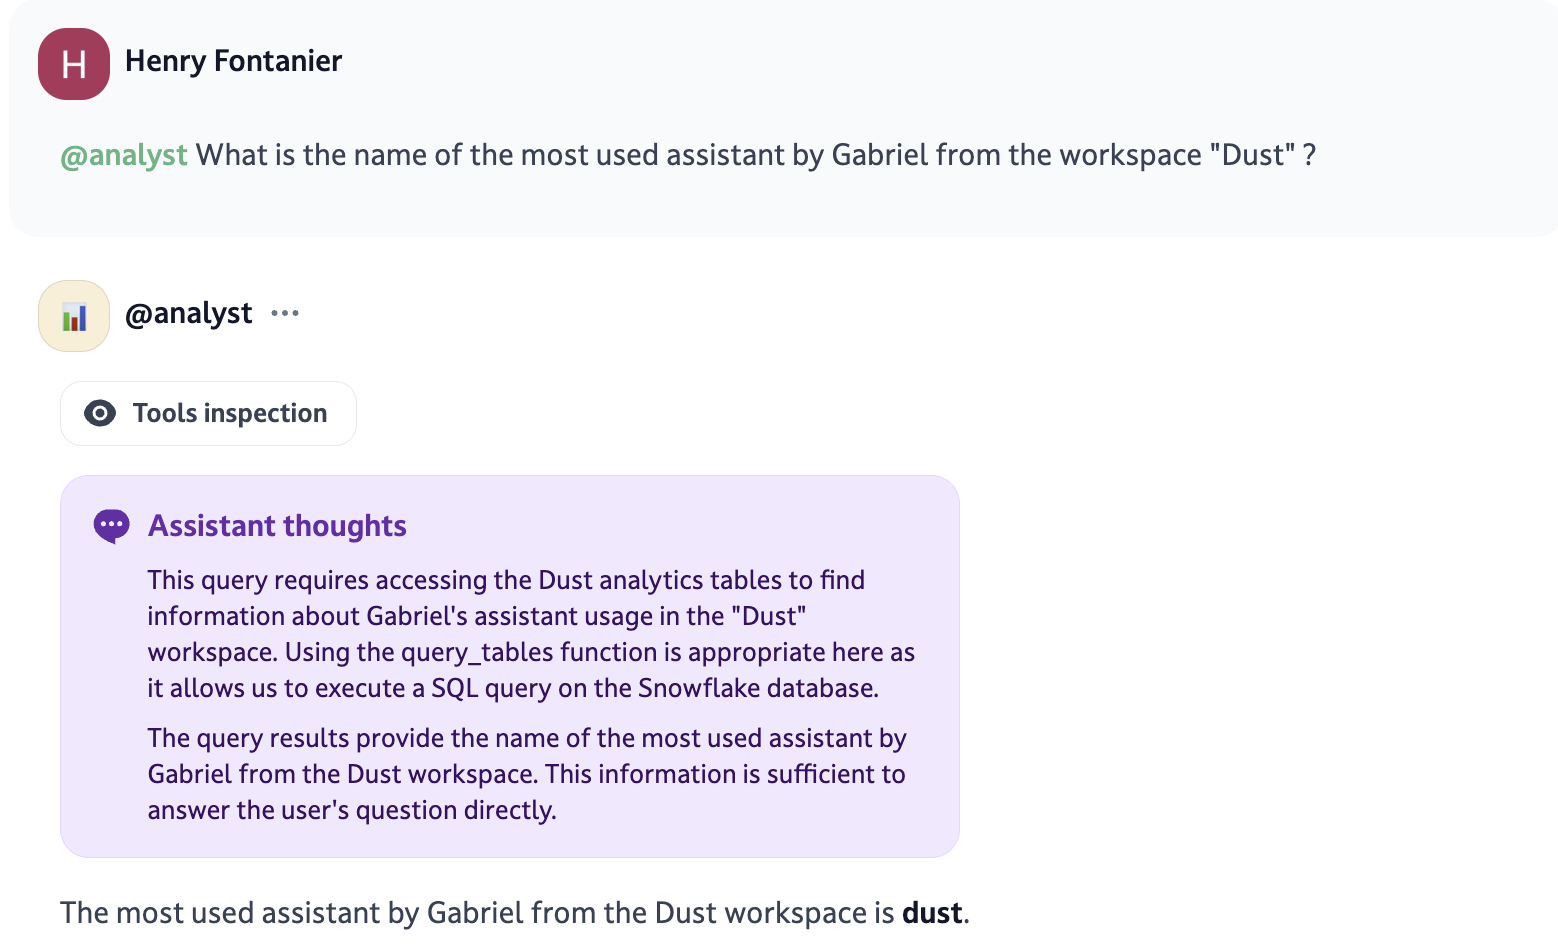
Dust agents are able to use the output from these queries to answer quantitative questions:
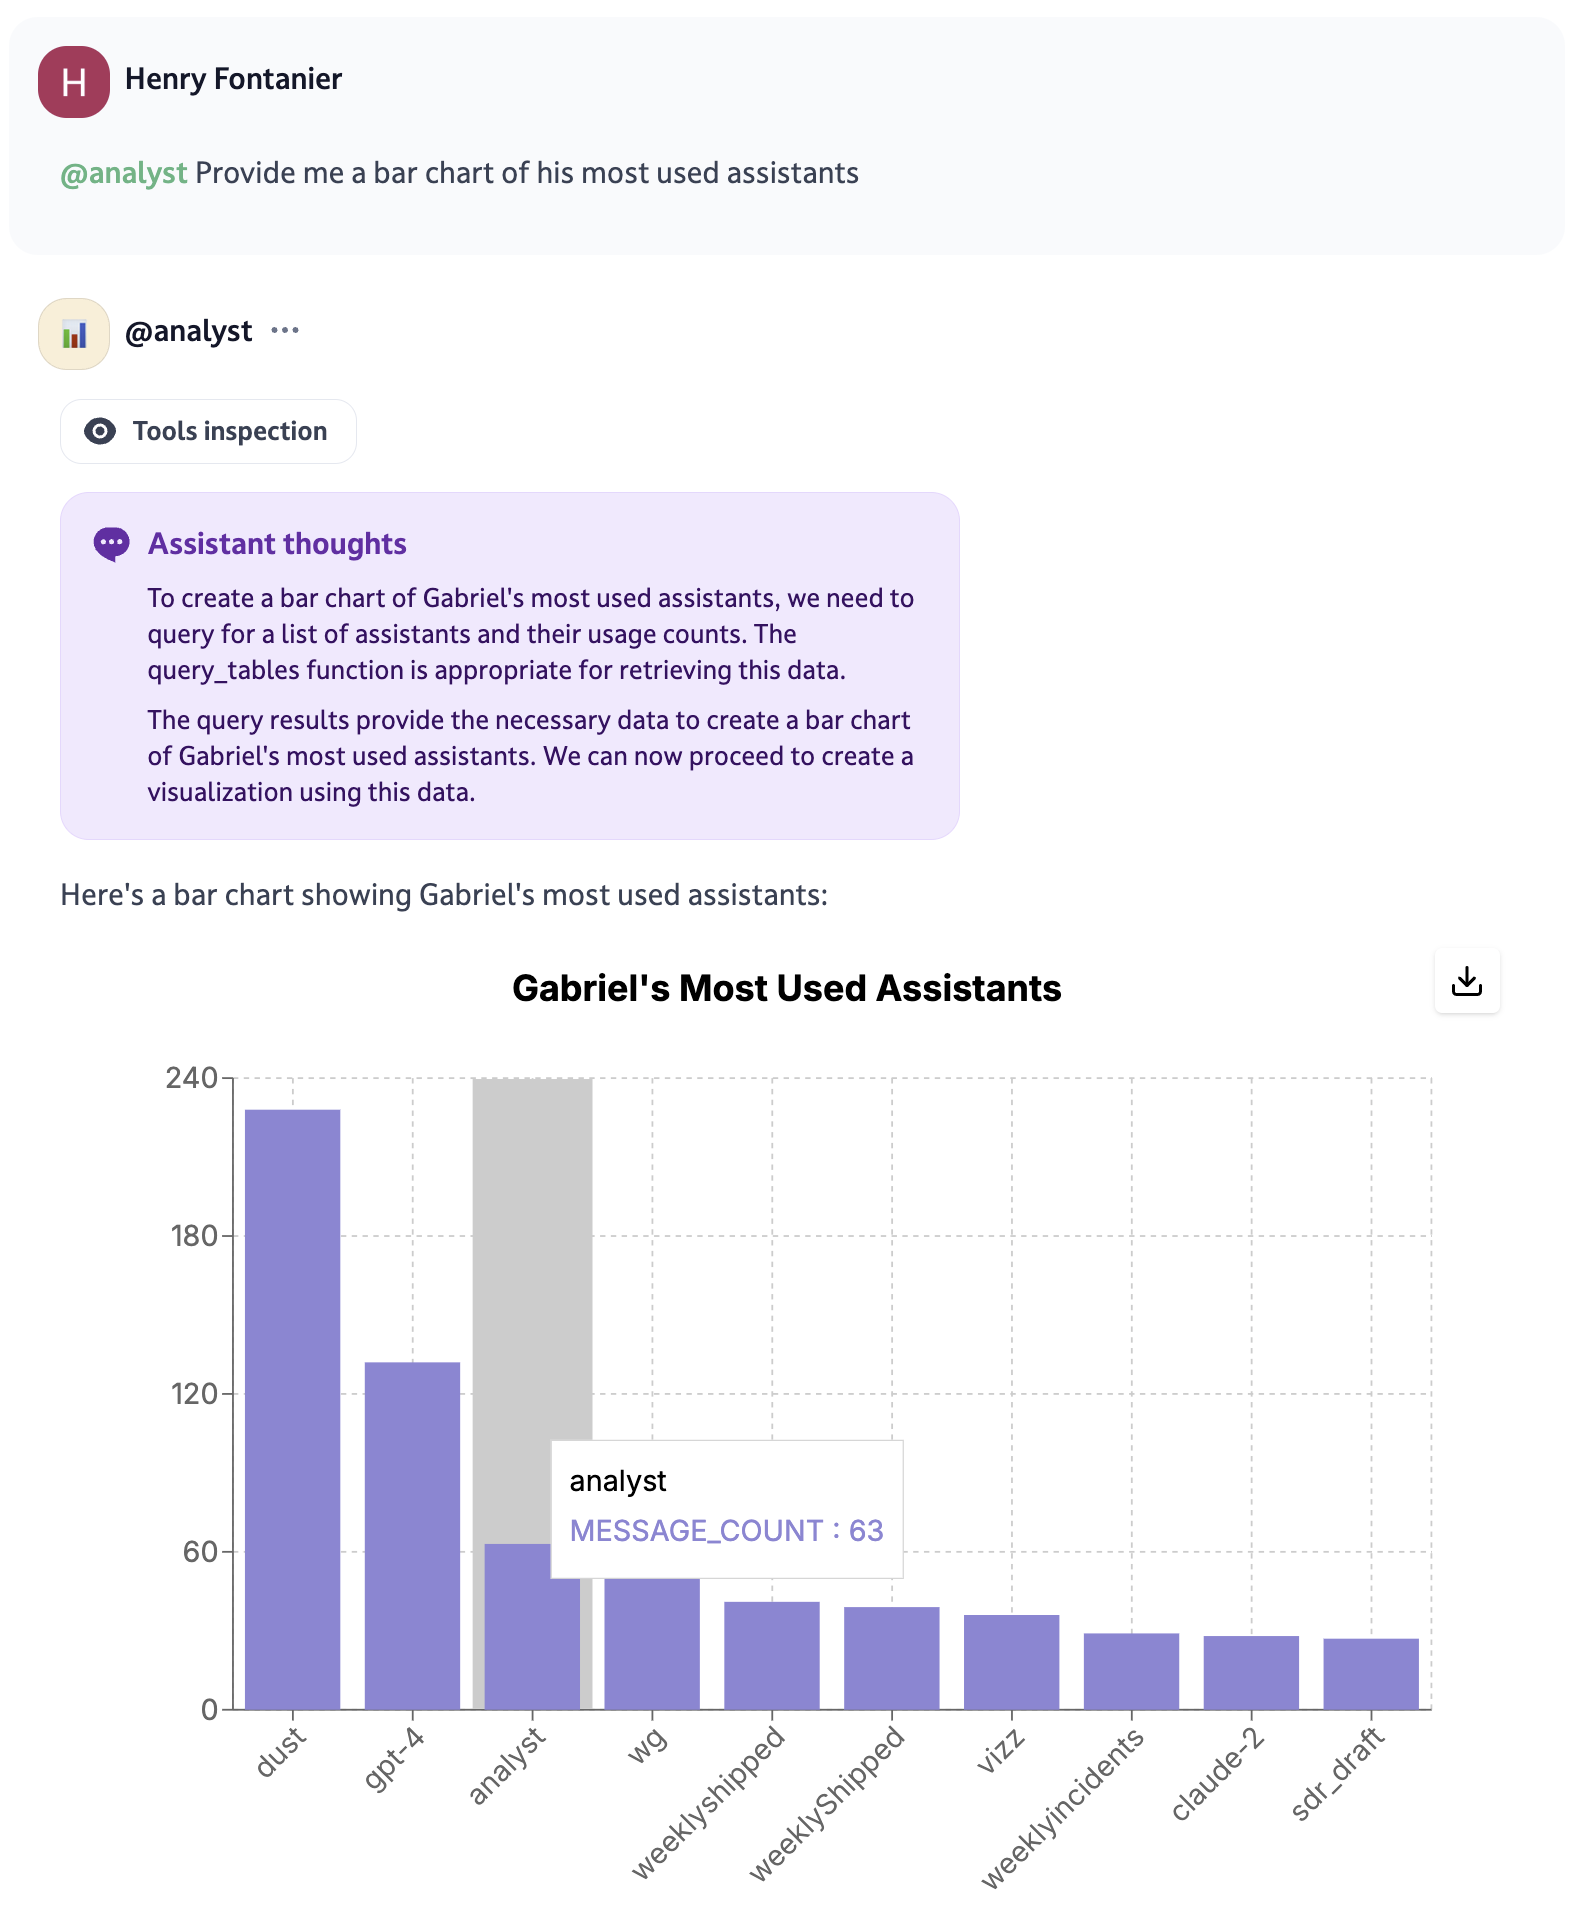
The agents can also leverage the results to create visualizations, such as charts:
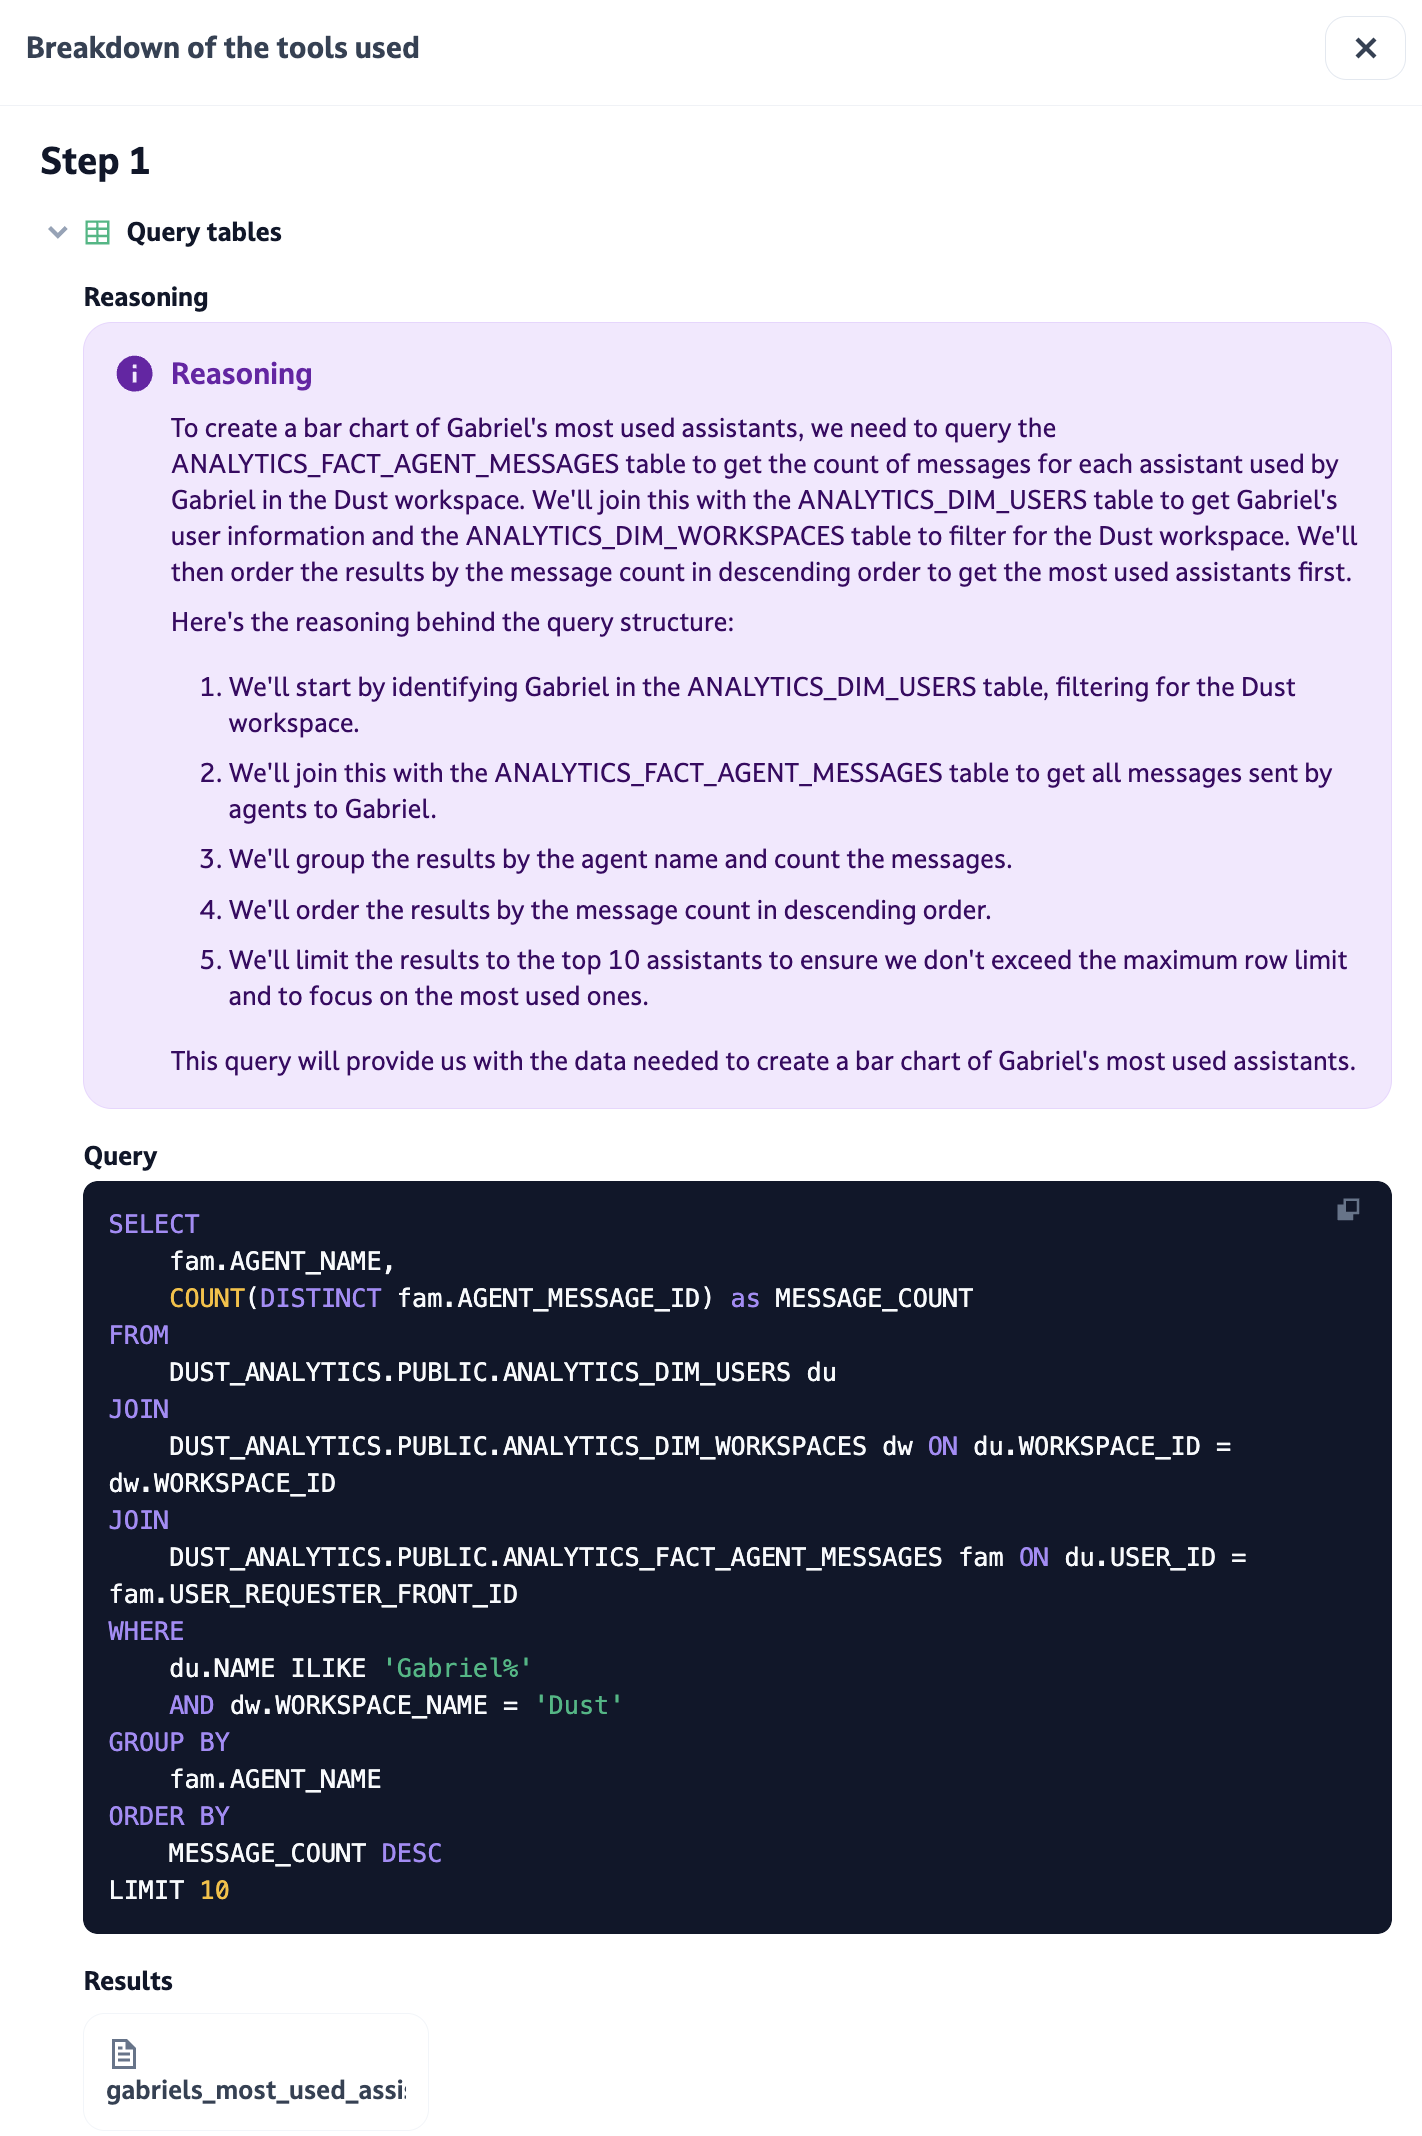
The "Tools inspection" button allows to view the reasoning and SQL query used by the agent to retrieve the data:
Setting up the Connection
Key Snowflake Concepts
Let's review some essential Snowflake concepts:
- Role: A collection of permissions that can be assigned to users.
- User: An account for accessing Snowflake. In this case, we're creating a service account for programmatic access, not for logging into the Snowflake web UI.
- Warehouse: A cluster of compute resources for running queries.
- Database: A container for schemas and other objects.
- Schema: A container for tables and other database objects.
- Table: A structure that stores data in rows and columns.
Authentication Methods
Dust supports two authentication methods for Snowflake connections:
- Username & Password (traditional method)
- Key Pair Authentication (recommended for enhanced security)
Key pair authentication uses RSA public/private key pairs instead of passwords. This method is particularly important as Snowflake is deprecating password-only authentication.
Choosing Your Authentication Method
- Password authentication: Simpler to set up, suitable for testing and development
- Key pair authentication: More secure, required by many organizations, recommended for production use
Follow the appropriate setup instructions below based on your chosen authentication method.
Step-by-Step Guide
Setup on Snowflake's side
Note: For configuring access to Snowflake, you may need to whitelist the following Dust static IP: If you're in the US (routes start with https://dust.tt) the IP is
34.46.9.232. For the EU customers (routes start with https://eu.dust.tt) the IP is35.195.191.222
We recommend creating a dedicated Warehouse, User and Role for Dust.
Setup the warehouse, role and user for Dust
Create a new role
First, create a role to manage the permissions:
CREATE ROLE dust_role;Create a new user
Create a new service account for Dust. Choose the method based on your authentication approach:
For Password Authentication:
CREATE USER dust_user
  PASSWORD = 'strong_password'
  DEFAULT_ROLE = dust_role;
Replace 'strong_password' with a secure, unique password.
For Key Pair Authentication:
CREATE USER dust_user
  DEFAULT_ROLE = dust_role
  RSA_PUBLIC_KEY = 'MIIBIjANBgkqhki...'; -- Your public key here
See the "Setting up Key Pair Authentication" section below for instructions on generating the key pair and obtaining the public key value.
This account is for programmatic access only, not for logging into the Snowflake web UI.
Create a new warehouse
Set up a dedicated warehouse for Dust:
CREATE WAREHOUSE dust_warehouse
WITH WAREHOUSE_SIZE = 'XSMALL'
AUTO_SUSPEND = 300
AUTO_RESUME = TRUE;
XSMALL is the smallest available size, suitable for many use cases. AUTO_SUSPEND is set to 300 seconds (5 minutes) to optimize costs. You can adjust these values as needed.
Grant warehouse usage to the role
Allow the role to use the warehouse:
GRANT USAGE ON WAREHOUSE dust_warehouse TO ROLE dust_role;
About permissions for the dust_roleMake sure you're not adding too many permissions to the dust_role user. Here's the max that we accept:
USAGE grant on these resources:
"TABLE",
  "VIEW",
  "EXTERNAL_TABLE",
  "DYNAMIC_TABLE",
  "EVENT_TABLE",
  "STREAM",
  "MATERIALIZED_VIEW",
  "HYBRID_TABLE",
  "ICEBERG_TABLE",
  "STREAM",
SELECT grant on these resources:
"SCHEMA",
  "DATABASE",
  "WAREHOUSE",
  "FILE_FORMAT",
  "FUNCTION",
  "PROCEDURE",
  "STAGE",
  "SEQUENCE",
  "MODEL",
Even if the Snowflake role has permissions on views, Dust ignores views when listing resources to query; only tables are considered for agent Table queries.
Grant the new role to the new user
Finally, assign the new role to the user:
GRANT ROLE dust_role TO USER dust_user;Setting up Key Pair Authentication
If you chose key pair authentication, follow these steps to generate your keys and configure them in Snowflake and Dust.
Step 1: Generate an RSA Key Pair
You'll need to generate a private key and a corresponding public key. The minimum key size is 2048 bits.
Generate an unencrypted private key:
openssl genrsa 2048 | openssl pkcs8 -topk8 -inform PEM -out rsa_key.p8 -nocryptGenerate an encrypted private key (recommended for production):
openssl genrsa 2048 | openssl pkcs8 -topk8 -inform PEM -out rsa_key.p8You'll be prompted to enter a passphrase. Remember this passphrase as you'll need it when configuring Dust.
Generate the public key:
openssl rsa -in rsa_key.p8 -pubout -out rsa_key.pubStep 2: Assign the Public Key to Your Snowflake User
Extract the public key value (remove the header and footer lines):
cat rsa_key.pub | grep -v "BEGIN PUBLIC" | grep -v "END PUBLIC" | tr -d '\n ; echo'Copy the output and assign it to your Snowflake user:
ALTER USER dust_user SET RSA_PUBLIC_KEY='MIIBIjANBgkqhki...';Replace the key value with your actual public key (without the -----BEGIN PUBLIC KEY----- and -----END PUBLIC KEY----- lines, and without line breaks).
Alternatively, you can set this during user creation as shown in the "Create a new user" section above.
Step 3: Secure Your Private Key
Keep your private key file (rsa_key.p8) secure. You'll need to provide it to Dust in the next section.
Security best practices:
- Never commit the private key to version control
- Store it in a secure location with restricted access
- Use an encrypted key with a strong passphrase for production environments
- Rotate keys periodically according to your security policy
GrantUSAGE on databases and schemas to the role
USAGE on databases and schemas to the role💡Granting USAGE for databases and schemas does not mean granting access to the tables inside.
It simply means that the Dust role on Snowflake will be aware of the existence of these databases & schemas, which is a pre-requisite if you wish to query some of the tables they contain.
For each Snowflake database that you wish to use through Dust, you will need to grant USAGE to the role:
GRANT USAGE ON DATABASE MY_DATABASE TO ROLE dust_role;For each Snowflake schema that you wish to use through Dust, you will need to grant USAGE to the role:
GRANT USAGE ON SCHEMA MY_DATABASE.MY_SCHEMA TO ROLE dust_role;⚠️If you want to use TableT which is in schema S which is itself in database D, you will need to grant USAGE on both database D and schemaS
Alternatively, you may decide to grant USAGE on all schemas inside of a database:
GRANT USAGE ON ALL SCHEMAS IN DATABASE MY_DATABASE TO ROLE dust_role;Grant SELECT on tables to the role
SELECT on tables to the role💡 GrantingSELECT on tables is what enables the Dust Snowflake role to execute SELECT SQL queries on the tables.
Our Snowflake integration will reject any role that has grants other than SELECT grants (it is very important that the Snowflake connection remains read-only, in order to fully prevent Dust agents from mutating your data)
You have the flexibility to grant access at two different levels: whole schemas, or individual tables. Choose the appropriate level based on your security requirements and Dust's needs.
a. Grant access to whole schemas
For each schema you want to give access to:
GRANT SELECT ON ALL TABLES IN SCHEMA MY_DATABASE.MY_SCHEMA
	TO ROLE dust_role;
GRANT SELECT ON FUTURE TABLES IN SCHEMA MY_DATABASE.MY_SCHEMA
	TO ROLE dust_role;
b. Grant access to specific tables
For each specific table you want to grant access to:
GRANT SELECT ON TABLE MY_DATABASE.MY_SCHEMA.MY_TABLE TO ROLE dust_role;Setup on Dust's side
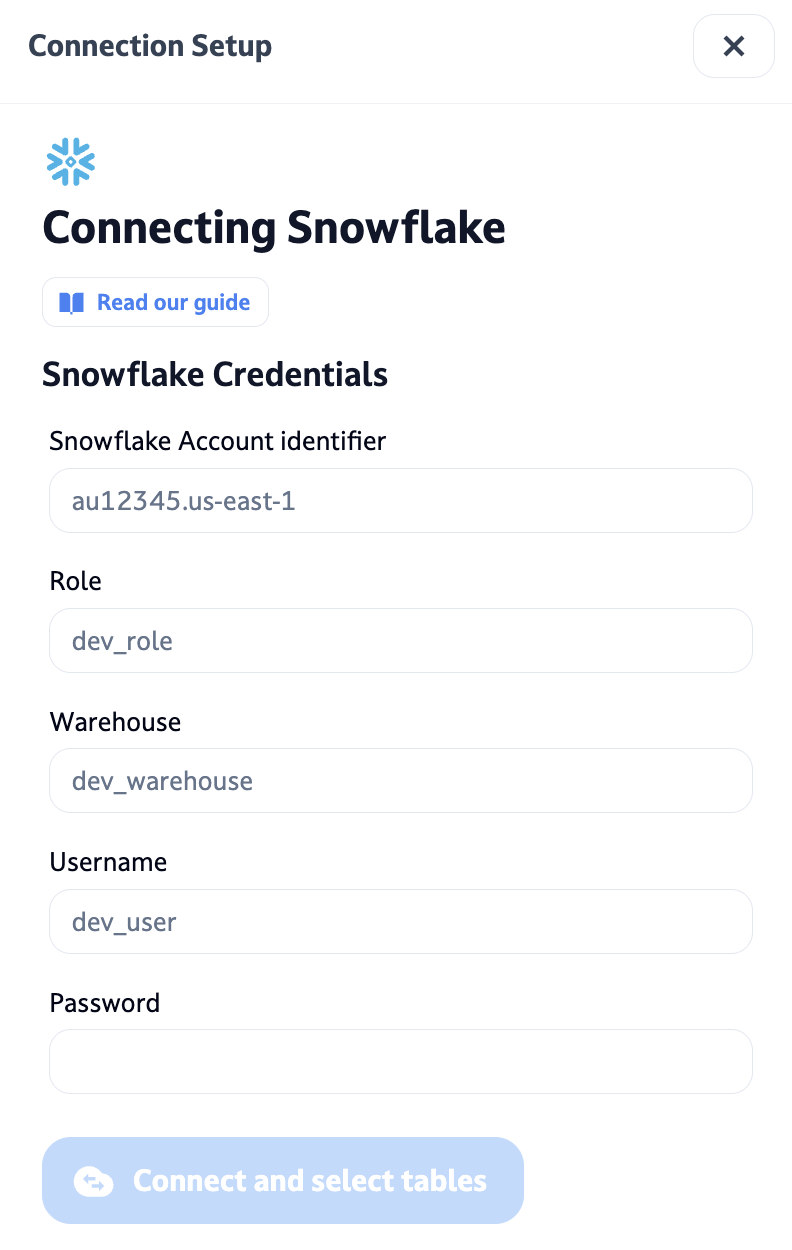
Once the Snowflake access has been setup, navigate to Dust's Spaces > Connections, click on "Add Connections" and select Snowflake.
You'll be prompted to choose your authentication method:
For Password Authentication:
- Select "Username & Password"
- Fill in the connection details:
- Snowflake Account identifier (e.g.,
au12345.us-east-1) - Role (e.g.,
dust_role) - Warehouse (e.g.,
dust_warehouse) - Username (e.g.,
dust_user) - Password
- Snowflake Account identifier (e.g.,
For Key Pair Authentication:
- Select "Key Pair Authentication"
- Fill in the connection details:
- Snowflake Account identifier (e.g.,
au12345.us-east-1) - Role (e.g.,
dust_role) - Warehouse (e.g.,
dust_warehouse) - Username (e.g.,
dust_user) - Private Key: Paste the entire contents of your private key file in PEM format, including the header and footer lines (e.g.,
-----BEGIN PRIVATE KEY-----...-----END PRIVATE KEY-----) - Private Key Passphrase: If your private key is encrypted, enter the passphrase. Leave empty if the key is not encrypted.
- Snowflake Account identifier (e.g.,
Supported private key formats:
- Unencrypted PKCS#8 (
-----BEGIN PRIVATE KEY-----) - Encrypted PKCS#8 (
-----BEGIN ENCRYPTED PRIVATE KEY-----) - PKCS#1 RSA keys (
-----BEGIN RSA PRIVATE KEY-----), encrypted or unencrypted
Press "Connect and select tables" to test the connection.
Once the connection is successful, you can select the tables you want to make available in Dust.
Tables only (no views)The Snowflake connector only syncs and exposes tables for Query Tables (Table queries) in agents. Views (including materialized views) are not supported and will not be exposed to agents.
Updated 6 months ago